Creating Folder Permissions
Welcome to another episode of Smart Tips! Today we're going to walk through how to create a folder and deliver permissions for that folder. This will allow you to decide whether specific individuals or groups have the ability to access the views within that folder. Let's jump in and figure this out.
In today's video, we'll be operating out of the deliverables table. On the left hand side, we can see a list of our views. As you can see, they are already organized in folders.
Creating a New Folder
If you're curious about how to create a folder, simply hover over the "Create New View" button. You'll see the ability to create a folder and then title it whatever you'd like.
In this case, I've already created these folders. I want to deliver permissions based on the approval status of these deliverables:
- For approved deliverables that are already fitting the status of "approved", I filtered it down to only show those ones. This is what I am allowing everybody within the company to have access to at this point.
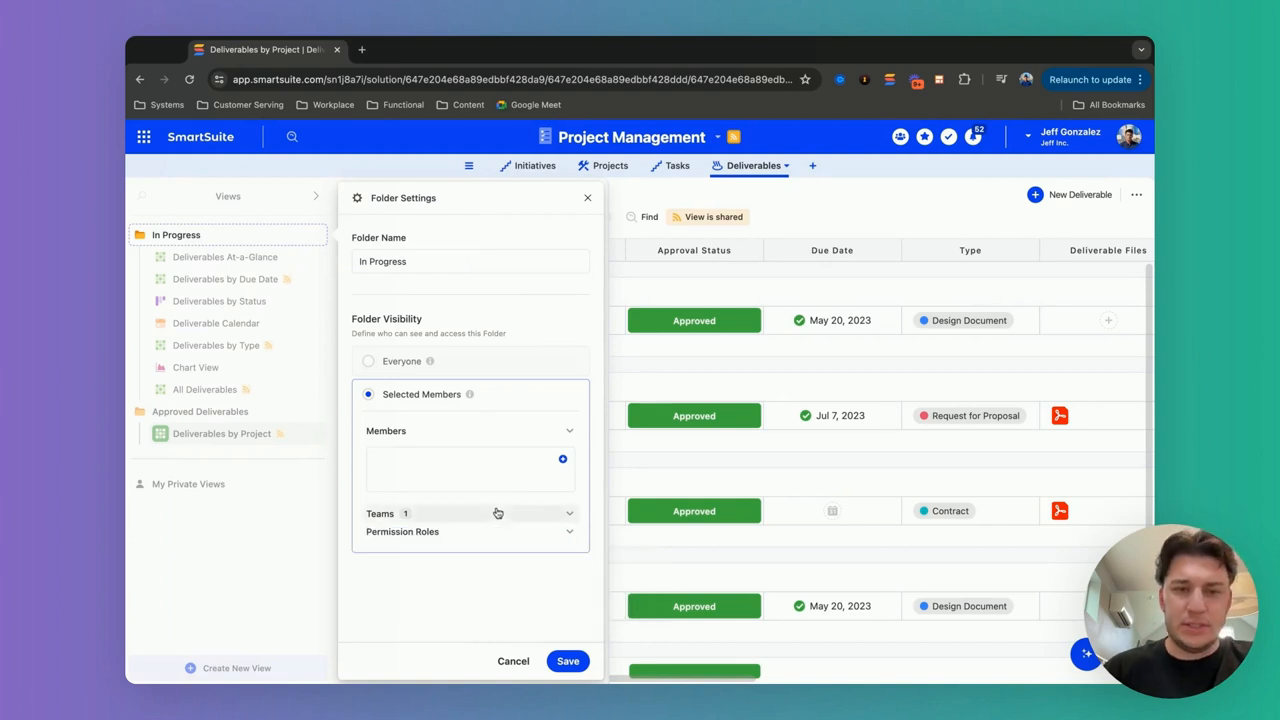
- If we come into the folder settings, I can choose whether I want it to be everybody who has access to it, or in this case, selected members.
So if deliverables are still in progress, which is what we're looking at in the "In Progress" folder, maybe I only want select members to be able to access these views.

Selecting Permissions
You have a few options when it comes to selecting who has access:
- You can choose from the list of individual members
- You can choose a team. If you've already put members into teams, like a "Project Team" which consists of a handful of members, you can grant that whole team access to this folder.
- You can also deliver permissions based on a group of users' level of access within this solution.
Just to make it a little bit easier, this is how we can deliver permissions at the view level via folders.

Practical Examples
Let's walk through a couple practical examples of when you might use folder permissions.
Example 1: Sensitive HR Information
Say you have a table that contains sensitive employee information - salaries, performance reviews, disciplinary records, etc. You obviously don't want everyone in the company to be able to see that.
You could create a folder called "Sensitive HR Info" and put all those views inside it. Then in the folder permissions, you select only the specific HR team members who need access to that information. Everyone else won't even see that the folder exists.
Example 2: Client Projects
Another scenario - let's say you use your base to manage client projects. Each client has their own table with project details, timelines, invoices, etc.
You could create a folder for each client, like "Acme Co. Projects" and "XYZ Inc. Projects". Then you can give access only to the team members who are working on those specific accounts.
This way, your whole company isn't seeing irrelevant project info, and there's no risk of mixing up or exposing data between clients.
Example 3: Board Meeting Documents
One more example - perhaps you have a "Board Meetings" table where you keep agendas, presentations, meeting minutes, etc.
You'd likely want to keep those documents limited only to board members and a few key executives. Easy - just put them in a "Board Docs" folder and configure the permissions accordingly.
Changing Permissions Over Time
Keep in mind, you can always change the permissions on a folder as needed. Going back to our client projects example - perhaps a new employee joins the "Acme Co." project team. No problem, just edit the folder settings and add them to the access list.
Or for those "In Progress" deliverables we looked at earlier - once a deliverable moves to "Approved" status, you can move it to the "Approved Deliverables" folder so it inherits those broader access settings.
The key is that you can adjust access at any time with just a few clicks. The folder structure provides an easy way to control permissions in bulk.
Troubleshooting Tips
What if you've set up your folder permissions but users are reporting that they can't access certain views? A few things to check:
- Make sure the user is included in the folder access settings. If they're not listed as an individual or part of a team with access, they won't be able to see the folder contents.
- Check that the views are actually in the right folder. A view will only inherit the permissions of its parent folder.
- Confirm the user's overall permission level on the base. Folder settings can grant access, but they can't override a user's base-level permissions. So if a user has "Read Only" access to the whole base, putting them in an "Editor" access folder won't make a difference.
If those all check out, try removing the user from the folder access list and re-adding them. Sometimes a quick reset like that can resolve any weird caching issues.
In Summary
Setting permissions on a folder level in SmartSuite is a powerful way to control access to specific views and data. The process itself is quite simple:
- Create your folders and organize your views in them based on whatever access levels you want
- Open the folder settings and choose which individuals, teams, or permission groups should have access
- Adjust those permissions any time as your access needs change
Taking a few minutes to structure your permissions this way can make a huge difference in keeping your base organized and your data secure. Plus, your users will appreciate only seeing the information that's truly relevant to them.

Run your entire business on a single platform and stop paying for dozens of apps
- Manage Your Workflows on a Single Platform
- Empower Team Collaboration
- Trusted by 5,000+ Businesses Worldwide


.avif)


