Hey there, fellow productivity enthusiasts! Today, we're diving into a question we've heard from our clients more than just a few times: "How do I send an email and make it magically turn into a record inside of my beloved SmartSuite?" Well, it may seem like something snatched from the future, but guess what? It's doable, and it won't take us an era to set up. Some might call it a hack; I call it smart-working.
Before we roll up our sleeves, let's get the preliminaries out of the way. You're going to need a small but mighty tool called 'make,' formerly known as Integromat. It's the glue that sticks our email to SmartSuite without getting our hands dirty with confusing API code.
Step 1: Initiate a Mailhook in Make
First things first – locate that nifty 'plus' icon on your make dashboard. Give it a click and search for the 'Mailhook' or 'webhook' module. This is your golden ticket, providing a unique email address that's about to become your new best friend for email automation.
Create a vial named 'SmartSuite Mailhook,' and voilà, a peculiar email address appears! It's as simple as copying and keeping it safe for the steps ahead.

Step 2: Cook Up a SmartSuite Connection
The Mailhook is all ears now, ready to latch onto the data from our emails. Next, we need to tell it what to do with that precious cargo. Here's where the 'Create a Record' module from SmartSuite saunters in.
To illustrate, let's peek into my SmartSuite – a no-fuss task table awaits with fields for a title, assignee, due date, and description. These are the breadcrumbs that will guide our email content to its new home.
Step 3: The Power of Parsing
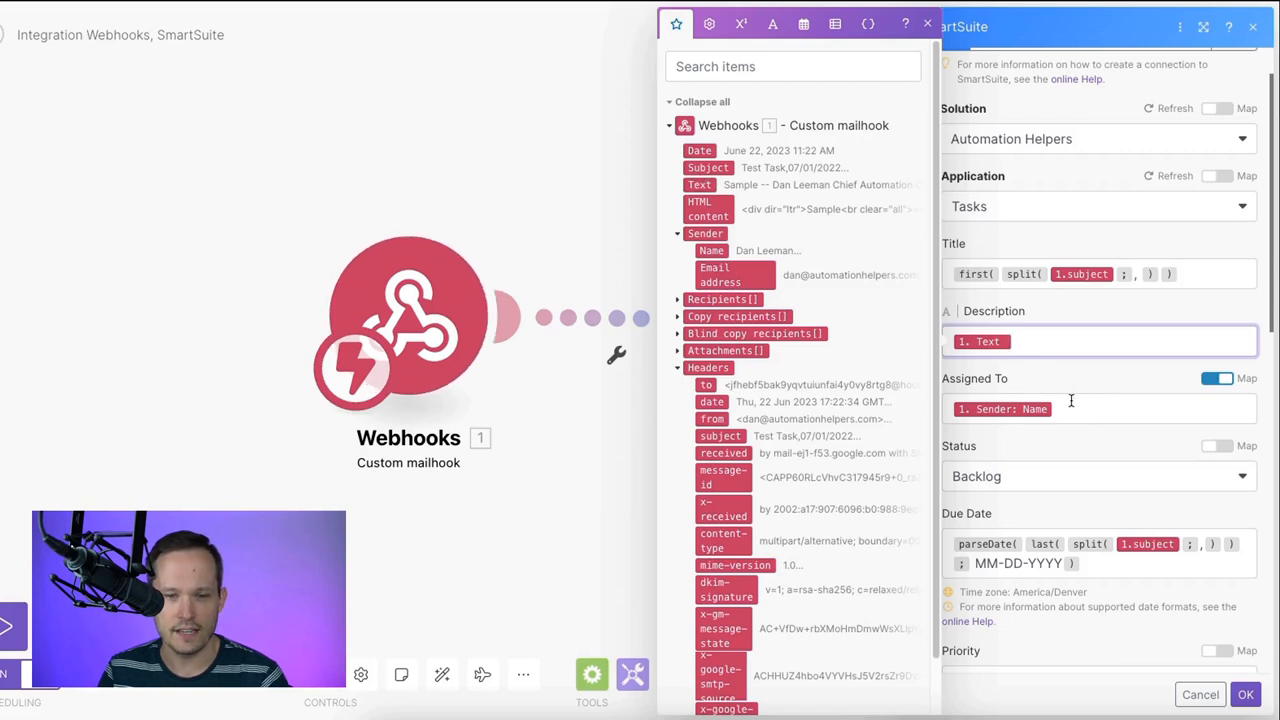
Now, how do we make English out of email jargon? By parsing! Think of it as teaching make to read the secret code that is your email's subject and body. Your subject becomes the task title, and the email body transforms into a rich description.

But what about that due date that doesn't exist in email time? Here's the trick: Slap the due date right after your task title in the email subject, separated by a comma. Easy, right?
Back in make's lair, we use a magical incantation called 'split' to cut our subject into bite-sized bits, zapping it into a list with our task title and due date cozily sitting as neighbors.
Step 4: Assign and Define
We're on a roll! Now, assigning the task to someone in SmartSuite is a breeze. Just ensure your email name matches the username in SmartSuite (watch out for those tricky Dan vs. Daniel moments).
By default, we set the status to 'backlog,' and then – the grand finale – we parse our date from the subject to match SmartSuite's appetite.

And with the flick of a save button, our automation scenario sparks to life!
Step 5: Test and Triumph
Ready for a test run? Send your crafted email to the Mailhook and watch as make works its magic, transforming your words into an actionable task in your SmartSuite.

Hop back into SmartSuite, and you'll see it's no illusion. There's your task, proud and ready, sporting a title, a detailed description (email signatures included), and a shiny due date.
"Send an email, create a task. What sorcery is this?" you might wonder. It's not witchcraft; it's work-craft, designed for doers, organizers, and task-masters like you!
Need a Helping Hand?
Our creative ingenuity doesn't stop here. With email attachments and other complex data, the possibilities are boundless. Remember, this is just a glimpse into a world where your inbox and SmartSuite hold hands and skip merrily through fields of productivity.
And there you have it – a neat little walkthrough on integrating your email with SmartSuite to streamline task creation. Whether it's tasks, orders, or customer records, it can all stem from the convenience of your inbox. Remember, with a touch of automation, no task is too small, no process too complex. Happy automating!
To experience SmartSuite's key benefits for yourself, start a free trial today and explore its intuitive work management platform.
Automation Helpers is a trusted SmartSuite partner. Book your free 30-minute consultation at automationhelpers.com to get started.


.jpg)


