


Are you tired of hitting the pause button on your team's productivity every time a new employee joins your company? Wouldn't it be awesome to have a written guide that covers all the basic info a newbie needs to know, so they can learn the ropes while your existing team members keep on doing their thing? In other words, wouldn't you love to invest some time upfront creating training materials, so you can save a ton of time each time a fresh face comes on board? Yeah, it's kind of a no-brainer, right?
That's exactly why we're diving into this step-by-step video tutorial on building your very own employee training portal (or as I like to call it, a "center learning thing" - catchy, huh?).
But for now, let's focus on the dynamic duo we're working with today: SmartSuite (the sponsor of this video) and Softr.
SmartSuite is going to be our trusty database, housing all the information and course content we'll be creating. It's like the ultimate filing cabinet for your training materials. And Softr? Well, that's the magic wand that'll transform our SmartSuite data into a snazzy, user-friendly interface that feels more like a dedicated website or app.
The Two Key Ingredients
- SmartSuite: Our database and information hub, where we'll store all the course content.
- Softr: The interface builder that allows us to add permissions and fancy features to our SmartSuite data, making it feel like a standalone website or app.
With these two tools and a sprinkle of creativity, we'll be whipping up a beautiful employee training portal in no time!
Building Your Training Library
First things first, we need a place to store all the information we want to teach. After all, how can your new hires learn if there's nothing to learn from? That's where SmartSuite comes in.
Setting Up Your SmartSuite Template
- Click "Add New Solution" and choose "Start with Template."
- Search for the "Employee Learning" template and click "Use Template" to install it into your account.
Voila! You now have a pre-built template that'll save you a good 20-30 minutes of setup time.

Customizing Your Template
Now that you have your template set up, let's take a quick tour of the data we're working with:
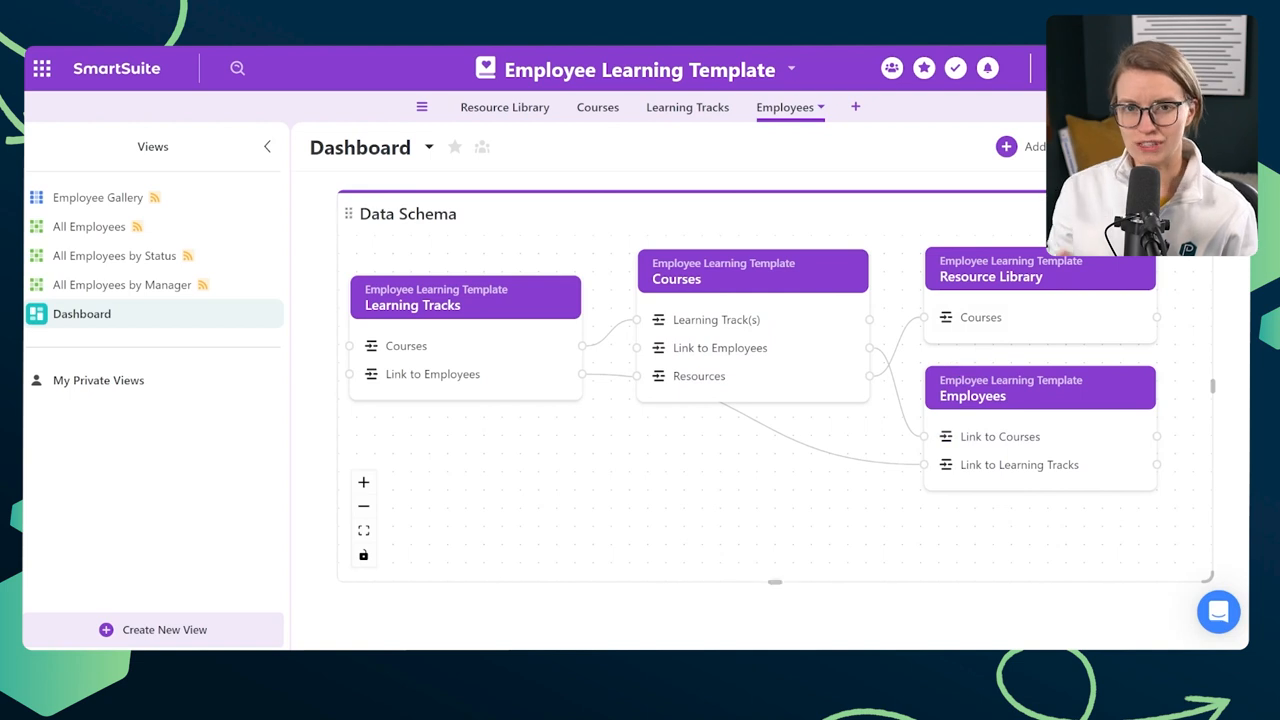
- Resource Libraries: This is where we store the details about our general resources, like the name, type, author, time to consume, description, and how it connects to courses.
- Courses: Here, we have similar fields to the Resource Libraries, as well as fields that link to employees. This is where we can pick which team members are enrolled in each course.
- Employees: This table is all about your team members. It's where you'll track which courses each employee has taken and which ones they should take next.

Pro Tip: Use the Data Schema widget in SmartSuite to get a visual representation of how all your fields and tables connect to each other. It's like a roadmap for your database!
Adding Some Extra Features
Okay, so we've got the basics down, but let's be real - we're not here for basic. We're here to create an employee training portal that'll knock everyone's socks off! So, let's add a few extra fields to make this thing really shine.
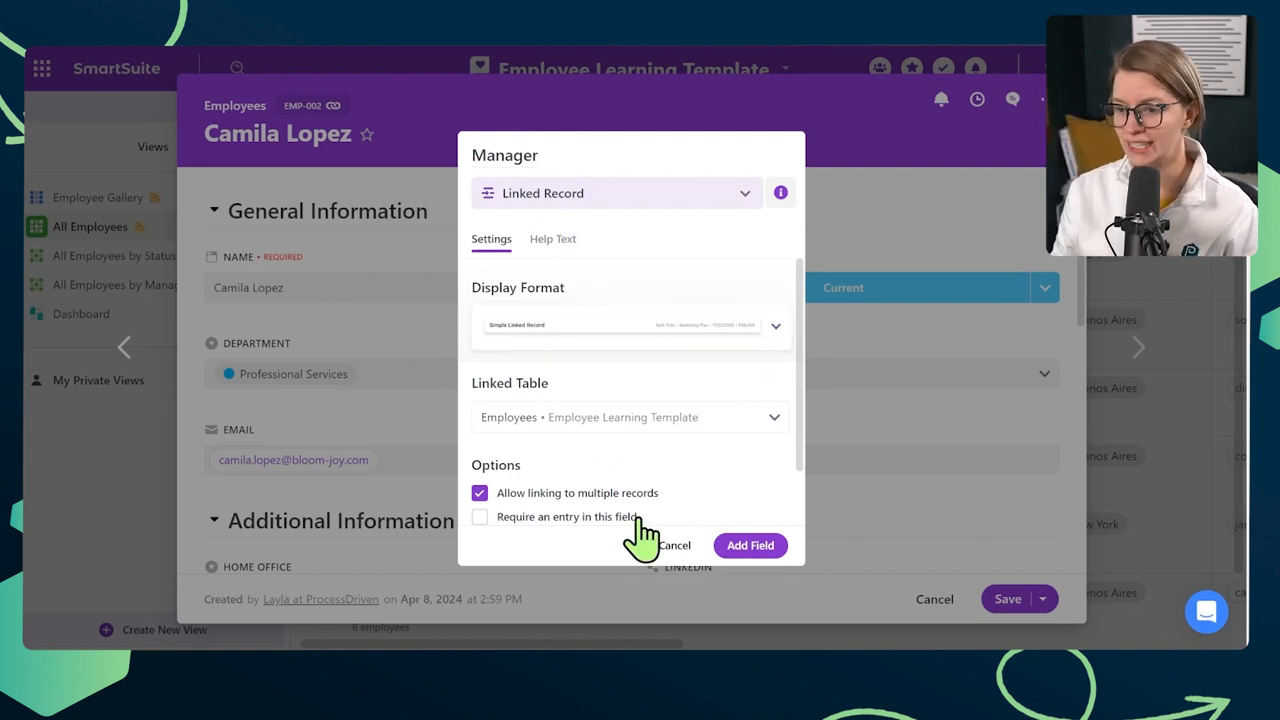
Adding a Manager Field
First up, let's add a "Manager" field to the Employees table. This way, we can keep track of who reports to whom, which will come in handy when we're setting up permissions later on.
- Open the Employees table and click "Insert New Field."
- Choose "Linked Record" and name it "Manager."
- Connect it to the same Employees table, allowing only one entry per employee.
- Create a backlink to make it a two-way relationship.
- Require an entry in this field moving forward.
Renaming Existing Fields
Next, let's rename a couple of fields in the Employees table to make them more descriptive:
- Change "Link to Learning Tracks" to "My Learning Tracks."
- Change "Link to Courses" to "My Courses."
Tracking Course Completion
Now, let's get a little fancy and add a way to track not just which courses an employee is enrolled in, but also which ones they've actually completed.
- Duplicate the "My Courses" field and rename it "Courses Completed."
- Use a formula field to calculate the difference between the total courses an employee is enrolled in and the courses they've completed.
COUNT(My Courses) - COUNT(Courses Completed)
Name this formula field "Courses Remaining" and add it to your Employees table.
Challenge Mode: If you're feeling extra adventurous, try adding this course completion tracking at the Learning Tracks level too!
Filling Your Training Library
Now that you've got your training library structure set up, it's time to fill it with some juicy content. Here are three ways to do just that:
- Buy Courses: Enroll your team in pre-made courses from platforms like Process Street's "How to Use SmartSuite" course or LinkedIn Learning.
- Observe Yourself: The next time you're training a new hire, have them write down everything you teach them, even if it's just bullet points. This real-world experience is like capturing your training process in real-time!
- Steal from Others: Get inspiration from other people's learning libraries. Here are some examples of what we love including in our own library at Process Street:
- Core Values document
- "What We Sell" document
- Customer Avatars
- Brand Voice and Brand Guide
- Meeting and Communication Guide
- Our own courses (e.g., "How to Use SmartSuite")
- How to Submit Time Off (SOP)
- Workspace Tour video
- Company Origin Story
- Human Resource Handbook
- Role-specific SOPs and processes
Kicking It Up a Notch with Softr
Alright, so you've got your training library filled with awesome content. You could just call it a day and hope your team navigates through the courses on their own. But let's be real - you're not the average bear, are you? You're an overachiever, and you want to take this thing to the next level!
That's where Softr comes in. We're going to use this magical tool to turn our SmartSuite database into a full-fledged online course platform. Your employees will be able to log in, view their courses, and have that sweet, sweet online course experience. And get this - even managers can modify the information inside SmartSuite right from the Softr interface. Mind. Blown.
Connecting SmartSuite to Softr
Now that you've got your Softr account set up, it's time to connect it to your SmartSuite database.
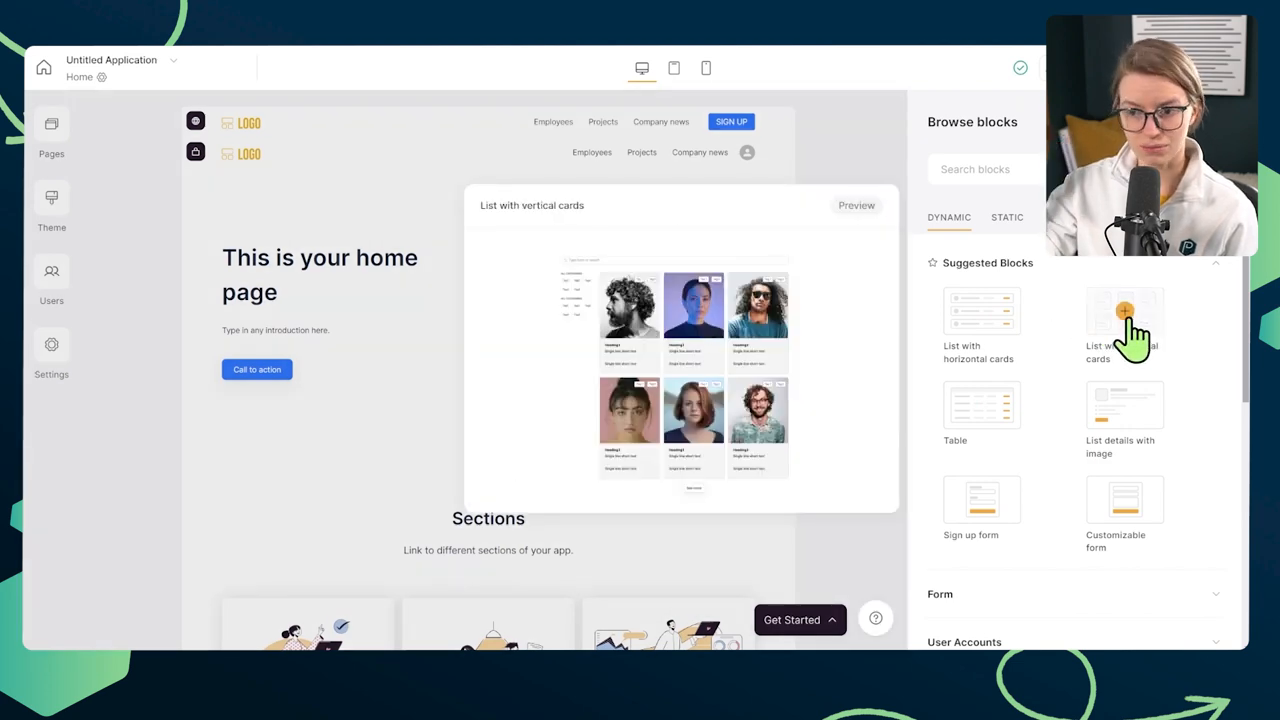
- In Softr, navigate to the "Pages" tab and select the "List" page.
- Click on the "Dynamic Block" and head over to the "Source" area.
- Select your SmartSuite account, workspace, and solution.
- Choose the "Courses" table to display on this page.
Setting Up User Groups and Permissions
To give managers and employees different permissions and experiences within your learning portal, we'll need to set up some user groups in Softr.
- Go to the "Users" tab and click "Sync with Data Source."
- Connect your SmartSuite account and select the "Employees" table.
- Map the SmartSuite fields to the corresponding Softr user fields (e.g., email, name, photo).
- Create a "Managers" user group based on the "Title" field in SmartSuite.
- Create an "Employees" user group for anyone whose title is not "Manager."
Building Your Learning Portal
Alright, now for the fun part - actually building out your learning portal in Softr! Here's a quick overview of what we'll be creating:
- A homepage that welcomes users and prompts them to log in or go directly to their courses.
- A "My Courses" page that displays only the courses assigned to the logged-in user.
- A course details page that shows the contents of each course based on the information in SmartSuite.
- Different navigation bars for managers and employees, with managers having access to a "My Direct Reports" page.
Pro Tip: Use conditional filters in Softr to display different content based on user groups or specific criteria.

The Magic of Two-Way Integration
One of the coolest things about using Softr and SmartSuite together is that you can modify your SmartSuite data directly from the Softr interface. This means managers can add new direct reports, update employee information, and even download reports right from the learning portal, and all those changes will be reflected in your SmartSuite database. It's like having your cake and eating it too!
So, go forth and create some awesome employee training content!
To experience the future of work management firsthand, start your free SmartSuite trial today!


.jpg)


